Installation and test of labeling machine MT-60
First, respectively install 2 pieces of organic glass tray on two round fixing block. After that, insert the slotted fixing block onto the tray mandrel, then pull the green O-rings into the slot of the fixing block, and finally, fix the fixing block with screws.
Label installation: put in the whole rolls label, and make sure the label will move counterclockwise, and then install the outer label fixing tray and tighten the screws.
Make labels go through the machine according to the image shown below. Wind the label head counterclockwise on the paper collecting wheel, and take out the backing paper clamp to clamp the label head, and finally tighten the Label pulling knurl wheel and the label pulling soft roller, otherwise the machine cannot work. The of label and the backing paper of the same section shall be on the same level after installation, and labels on each guide rod shall be adjusted to an appropriate position to ensure correct labeling.
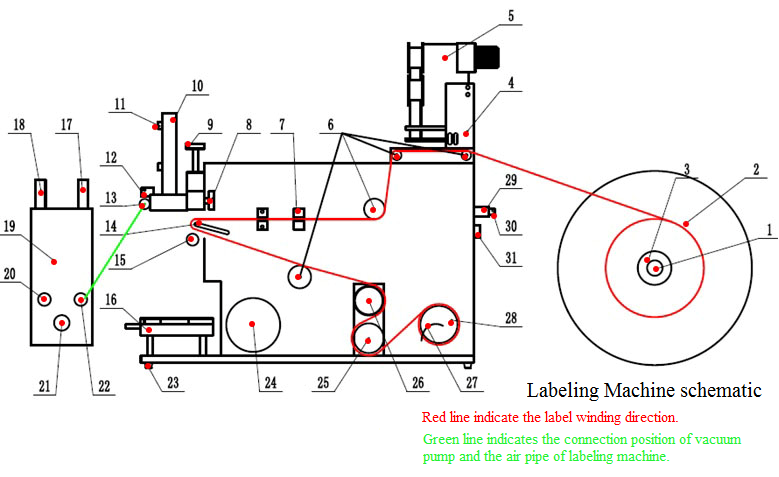
Plug the labeling machine into a single-phase power supply (a good ground connection is required).
Connect the gas source to the air tube socket on the air pressure regulating valve, turn on the gas source switch and adjust the air pressure until the air pressure on the gas-pressure meter is between 0.4-0.6 MPa.
Turn on the power switch and adjust the label sensor:
The label sensor is consist of amplifier and u-type fiber head, as shown in the figure:
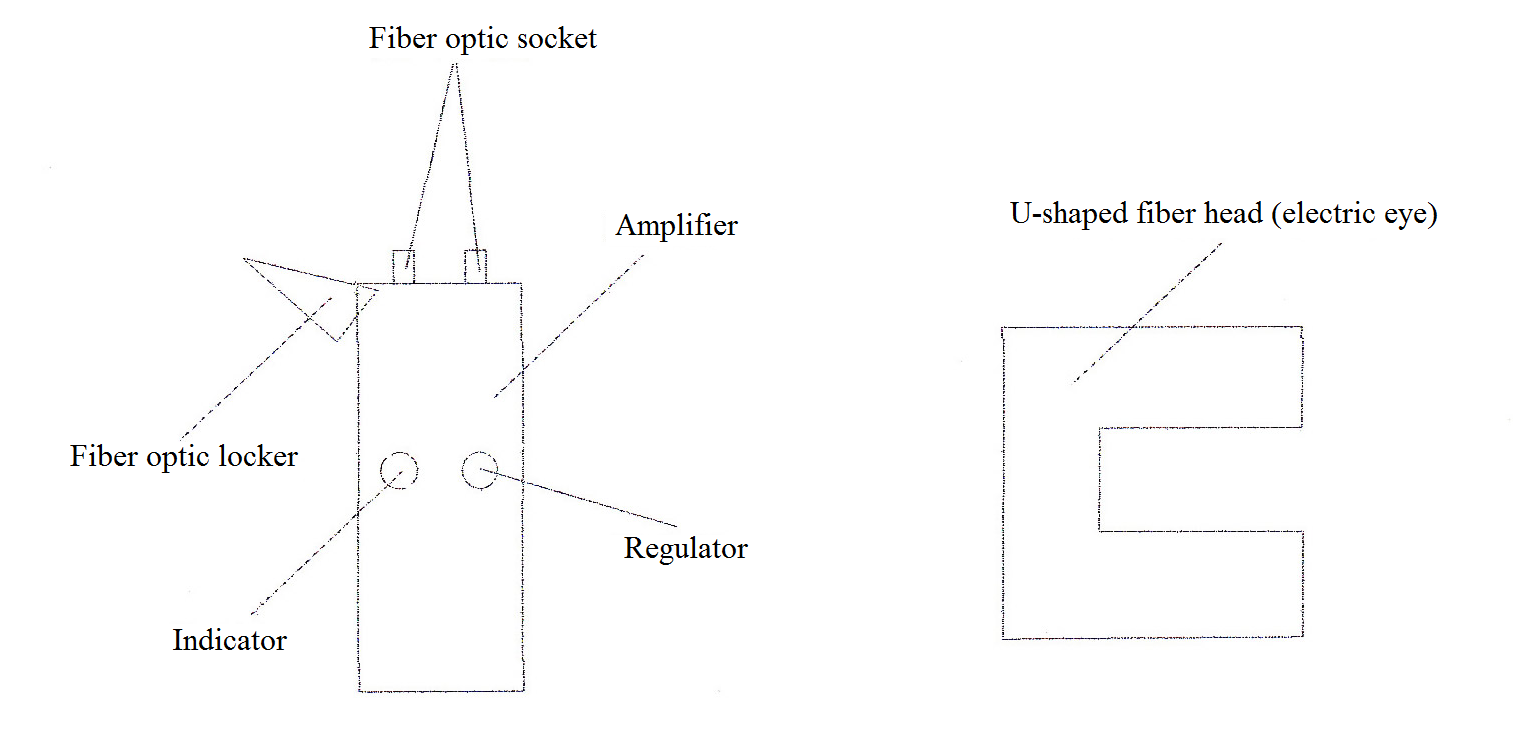
Primarily, insert the two wires of the U-shaped fiber head into the fiber optic socket for about 2 cm, lock the fiber optic locker, and then counterclockwise adjust the regulator to the lowest position. Make the adhesive label pass through the U-shaped groove of the fiber head, and align middle spaces between two labels to the fiber head, or tear an adhesive label and align the torn part with the fiber head. After that, clockwise adjust the regulator to make it rise slowly, until the indicator lights up. Pull the label back and forth, the indicator will be off when there is an adhesive label aligned with the fiber head, and the indicator will light up if it is the middle space between two labels aligned with the fiber head. Then fine-tuned again to stabilize the signal. After that all above steps are completed, the label sensor has been successfully debugged. Generally, it will be debugged before shipment.
A: Label sensor position: it will affect label stopped position. Different sizes of labels require different label sensor position. If the position is too back, labels will not be peeled.
B: Label stopped position:it refers to the length of the label sticking out of the stripping plate before labeling, and is controlled by the label sensor. General it need to be adjusted until the label can be absorbed by the labeling head.
Adjustment of the lifting height of the labeling head: lifting height is adjusted according to the object height, and is controlled by moving the magnetic switch on the labeling head cylinder.
Adjustment of blowing rod position: it is used to prevent labels from rolling up. Adjust the blowing rod according the label length.
Press down the foot switch, the labeling head will fall down and stick labels on the item. Adjust the stroke of the labeling head according to the item height, so that the labeling head can adsorb the label and press the item directly. The two upper and lower magnetic switches on the labeling head cylinder are used to adjust the stroke of the cylinder.
Adjust the position of the item to be labeled on the workbench according to the label position absorbed on the labeling head.
Leave your comment
Also Offers


Containment Automatic Capsule Filling Machine SFK-703

Fully Automatic Dosator Capsule Filling Machine CZ-40


Our Team
As an expert in the pharmaceutical and pharmaceutical packaging industry, iPharMachine has provided solutions for hundreds of pharmaceutical and health product manufacturers for 17 years. By visiting customers, we get good reviews from our customers.
- info@ipharmachine.com
- English Español Deutsche