Semi-auto Round Bottle labeling Machine MT-50W: Installation & test
Adjustment before operation
Adjustment of bottle supporting stand
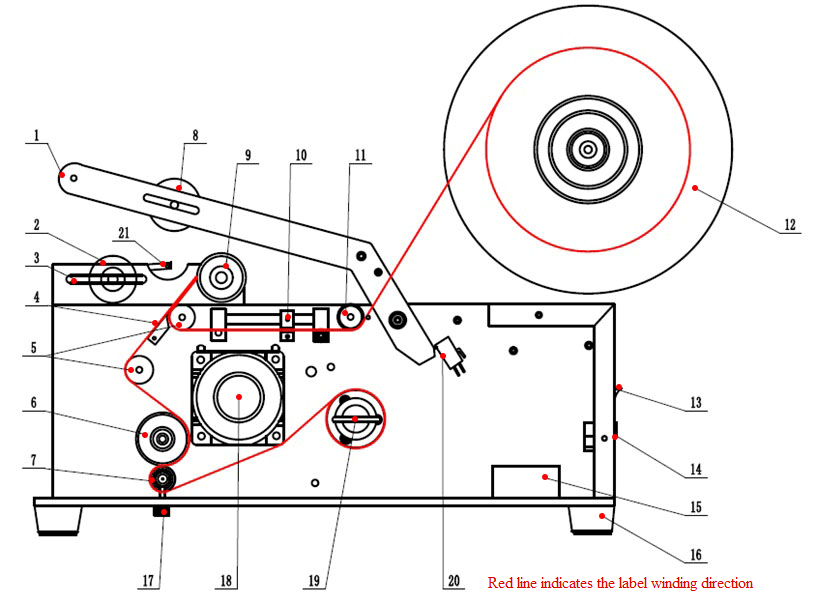
Loosen two fastening screws below the bottle supporting stand (3). Adjust and move the bottle supporting stand (3) according to the diameter of the bottle to be labeled to make the bottle between the bottle supporting roller (2) and labeling soft roller (9). The bigger the bottle diameter is, the larger the distance between the two rollers will be. Fasten the screws when the distance is appropriate.
Adjustment of bottle pressing roll
Loosen the screws on both ends of the bottle pressing roller (8), and adjust the bottle pressing roller (8) to an appropriate position, so that the bottle pressing roller (8) can exactly pin the center of the bottle when it is pressed down with the rotation of the bottle pressing swinging arm (1). Fasten the screws after completing adjustment.
Adjustment of microswitch (no adjustment needed if the bottle dia. is 20-100mm)
Pull the bottle pressing swinging arm (1) to make the bottle pressing roller (8) pin the bottle to be labeled, so that the lower part of the bottle pressing swinging arm (1) will touch the microswitch (20) and makes a slight switch sound.
Adjustment of the catch pin position
Adjust the catch pin (21) to an appropriate position so that the label will be affixed on the correct position of the bottle.
Adjustment of the label stripping plate
Adjust the label stripping plate (4) to make the stripping plate as close to the labeling soft roller (9) but without touching it.
Installation of adhesive label
Install the whole roll of adhesive label onto the paper supply tray with the label facing upward and backing paper downwards to make it pass through guide rod (11) and the inter space of the label sensor (10). Make the label go from the bottom of the transition roller (5) up through the gap between the stripping plate (4) and the labeling soft roller (9), and goes down along the left side of the stripping plate. Then adjust the label pulling adjusting screws (17) to make a gap between the label pulling knurl wheel (7) presses and the label pulling soft roller (6). After that, make the label pass through the right side of the label pulling soft roller (6), and go through the gap between two rollers, and then goes backwards to cross the left side of label pulling knurl wheel (7). Finally fix the backing paper of the label to the paper collecting wheel, and the fasten the label pulling adjusting screws (17) on both sides so that the label pulling knurl wheel (7) presses against the label pulling soft roller (6) with certain even force on both sides.
The label winding is shown as below
Adjustment of the label sensor position
Adjust the position of the fiber seat (10) by moving to the left or right in order to adjust the expected amount of label feeding.
Cleaning-up before operation
Clear all the sundries on the label pulling soft roller (6), guide rod (11), stripping plate (4), bottle pressing roller (8), and the case, and check if all screws have been fastened.
Adjustment of power supply
This model uses AC 220V/110V voltage, and single-phase three-wire three-core power plug. Check all the power sockets before using and make sure that the Round Bottle labeling Machineis connect to a socket with reliable ground. Plug in the power cord and turn on the main power switch.
Adjustment of label sensor
As shown in Figure 2.2.1, set the signal output delay switch to 0, and set the light on / off switch to the light on (L.ON).
Clockwise rotate the "signal sensitivity adjusting knob" clockwise to increase the light penetration intensity;
Counterclockwise rotate the "Signal Sensitivity Adjustment Knob" to weaken the penetration of the light.
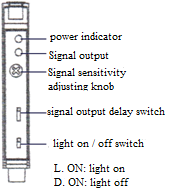
Figure 2.2.1 label sensor diagram
L. ON: light on
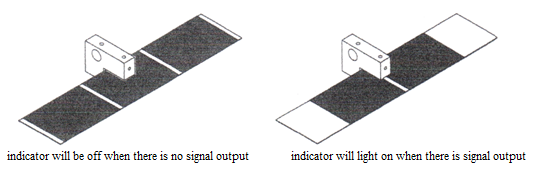
Figure 2.2.2 signal diagram of the sensor
As shown in Figure 2.2.2, rotate the “signal sensitivity adjusting knob” clockwise or counterclockwise to observe whether the “signal output indicator” on the label sensor (10) lights up or not for optimal detection status.
Also Offers


Containment Automatic Capsule Filling Machine SFK-703

Fully Automatic Dosator Capsule Filling Machine CZ-40


Our Team
As an expert in the pharmaceutical and pharmaceutical packaging industry, iPharMachine has provided solutions for hundreds of pharmaceutical and health product manufacturers for 17 years. By visiting customers, we get good reviews from our customers.
- info@ipharmachine.com
- English Español Deutsche