coding machine & vacuum pump: Installation and test
Installation and test of the coding machine
Putting in the ribbon: slightly remove the ribbon-transferring wheel nut, outer reel, and the pare core of the ribbon. Put in a new ribbon, and then install the outer reel and the ribbon transferring wheel nuts in order. Wind the ribbon in order according to the figure, and finally stick the ribbon to the paper sleeve of the ribbon collecting wheel with an adhesive sticker. When install the ribbon, please make sure that the coloring side does not face the center of the axis and the roller. Besides, when the ribbon goes through the space between the stepping wheel and the ribbon pressing roller, pull the swing arm handle pressing of wheel inward to make the ribbon pressing roller slight away from the stepping wheel, And release the handle after the ribbon passed through. The ribbon pressing roller will go back under the action of the spring.
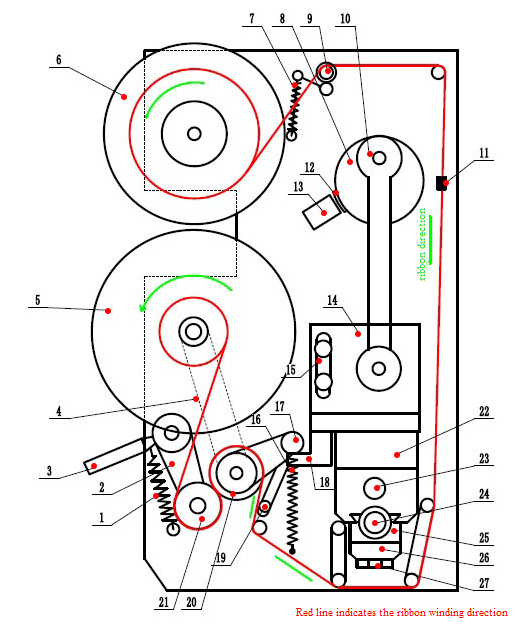
Adjustment of the ribbon width
Adjust the position of the plastic outer ring of the ribbon guide shaft to make the distance between the two rings be 1 mm larger than the ribbon width.
Adjustment of the connecting rod
Adjust the length of the connecting rod according to the label thickness. Loosen the two nuts of the double-headed screw of the connecting rod. There are left-hand thread and right-hand thread of the double-headed screw, and simply pull the hexagonal-column of the screw to change the length of the connecting rod. The correct length of the connecting rod needs to be adjusted based on the lettering depth on the label. Please make sure that when the print head is at the lowest position, the copper character is 0.5 mm lower than the highest of the printed label. Therefore, rotate the eccentric with an Allen wrench to make it at the bottom dead center position. At this time, pull the hexagonal column of the double-headed screw until there is a little resistance when twitch the label by hand, which means that there is basically no gap between the copper character and the object to be printed. After that, move the hexagonal column for 3 or 4 edges to the direction of connecting rod elongation, and then tighten the nut.
Note: variations of the connecting rod length will affect the lettering pressure. If the pressure is too high, the ribbon and the label will be broken; and if the pressure is too low, printed character will not be clear.
Adjustment of ribbon step pitch
When the printing head reciprocates once, driven by the stepping arm, stepping wheel swinging arm and unidirectional movement mechanism fixed on the right-angle stand, stepping wheel counterclockwise rotate by an angle, and then drives the ribbon to move for a distance, which is called the step pitch. If the step pitch is too large, the ribbon is wasted, while if the step pitch is too small, the printing will be overlapped and unclear. The best step size should be 1mm larger than the total height of the character string.
For adjusting the ribbon step pitch, release the nut of the step pitch adjusting screw, move the nut upwards to increase the step pitch, and move downwards to reduce the step pitch, and tighten the nut after adjustment.
Adjustment of temperature
Clockwise rotate the temperature adjustment knob, then the temperature rises; rotate counterclockwise to lower the temperature.
The labeling machine warm-up time is about 15-20 minutes. For urgent using, adjust the temperature to the maximum value, and then adjust the temperature knob back after that the temperature meets requirement, so that the warm-up time can be shortened.
Note: Because this machine adopts the principle that is control temperature by time-, and may be affected by the material properties, thickness, environment and other factors, the best temperature should be confirmed according to the printing effect.
Adjustment of the printer position
Loosen the screw on the mounting bracket of the printer and move the printer longitudinally so that the copper character of the printer can be printed on the desired position of the label.
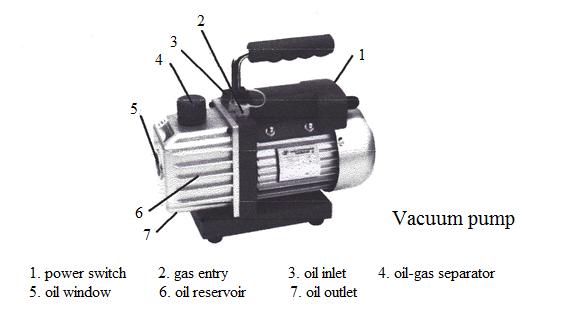
Installation and test of vacuum pump
Take off the vent cap before using, check out oil level to ensure it is not lower than minimum oil level, please add oil timely if the oil is insufficient.
Insert the air inlet tube into the labeling head suction tube socket. The shorter the pipeline is, the greater the suction force will be. The pipeline shall be reliably sealed and no leakage.
When the labeling machine needs to work, plug in the power plug, and turn on the power switch.
After usage, turn off the power switch, unplug the power plug in time, and remove the connecting pipe.
Leave your comment
Also Offers


Containment Automatic Capsule Filling Machine SFK-703

Fully Automatic Dosator Capsule Filling Machine CZ-40


Our Team
As an expert in the pharmaceutical and pharmaceutical packaging industry, iPharMachine has provided solutions for hundreds of pharmaceutical and health product manufacturers for 17 years. By visiting customers, we get good reviews from our customers.
- info@ipharmachine.com
- English Español Deutsche
